背景
近期,由于个别用户在 Docker Hub 上传了领导人的 AI 语音项目,导致中国区的 Docker 官方仓库被封锁。在这一事件的影响下,国内所有 Docker 镜像服务均被迫下架,涵盖了阿里云镜像服务、上海交通大学镜像服务等。此外,Docker Hub 的官方域名也遭到封锁。
此次 Docker Hub 的封锁给国内依赖 Docker 的开发和运维团队带来了重大挑战。首先,团队成员无法直接从 Docker Hub 拉取或推送镜像,这直接影响了软件的开发和部署效率。此外,依赖 Docker 镜像的自动化构建和持续集成/持续部署(CI/CD)流程也因此受到阻碍,增加了项目管理的复杂性和时间成本。团队不得不花费额外时间和资源寻找并配置国内的替代 Docker 镜像源或私有镜像仓库,这不仅增加了工作量,还可能带来额外的安全性和稳定性问题。
尽管面临种种挑战,但通过使用 Cloudflare Worker 自建镜像代理,我们能有效绕开这些访问限制,确保顺畅获取所需的 Docker 镜像。在接下来的内容中,我将详细介绍如何利用 Cloudflare Worker 自建镜像代理,为你的项目恢复正常的开发和部署流程,确保技术团队可以继续高效工作。
前提条件
在开始之前,你需要准备一个域名和一个 Cloudflare 账号。
操作步骤
Step 1: 创建 Worker
在 Cloudflare 创建一个 Worker,如命名为 docker,然后将以下代码粘贴到 Worker 中,并点击 部署:
addEventListener("fetch", (event) => {
  event.passThroughOnException();
  event.respondWith(handleRequest(event.request));
});

const dockerHub = "https://registry-1.docker.io";
const HTML = `
<!DOCTYPE html>
<html lang="zh-CN">
<head>
    <meta charset="utf-8">
    <meta name="viewport" content="width=device-width, initial-scale=1">
    <link rel="shortcut icon" href="https://voxsay.com/assets/img/favicons/favicon.ico">
    <title>Docker 镜像代理使用说明</title>
    <style>
        body {
            font-family: 'Roboto', sans-serif;
            margin: 0;
            padding: 0;
            background-color: #f4f4f4;
        }
        .header {
            background: linear-gradient(135deg, #667eea, #764ba2);
            color: #fff;
            padding: 20px 0;
            text-align: center;
            box-shadow: 0 2px 4px rgba(0, 0, 0, 0.1);
        }
        .container {
            max-width: 800px;
            margin: 40px auto;
            padding: 20px;
            background-color: #fff;
            box-shadow: 0 4px 8px rgba(0, 0, 0, 0.1);
            border-radius: 10px;
        }
        .content {
            margin-bottom: 20px;
        }
        .footer {
            text-align: center;
            padding: 20px 0;
            background-color: #333;
            color: #fff;
        }
        pre {
            background-color: #272822;
            color: #f8f8f2;
            padding: 15px;
            border-radius: 5px;
            overflow-x: auto;
        }
        code {
            font-family: 'Source Code Pro', monospace;
        }
        a {
            font-weight: bold;
            color: #ffffff;
            text-decoration: none;
        }
        a:hover {
            text-decoration: underline;
        }
        @media (max-width: 600px) {
            .container {
                margin: 20px;
                padding: 15px;
            }
            .header {
                padding: 15px 0;
            }
        }
    </style>
    <link href="https://fonts.googleapis.com/css2?family=Roboto:wght@400;700&family=Source+Code+Pro:wght@400;700&display=swap" rel="stylesheet">
</head>
<body>
    <div class="header">
        <h1>Docker 镜像代理使用说明</h1>
    </div>
    <div class="container">
        <div class="content">
          <h3>带镜像仓库地址使用说明</h3>
          <p>1.拉取镜像</p>
          <pre><code># 拉取 redis 官方镜像(不带命名空间)
docker pull {:host}/redis

# 拉取 rabbitmq 官方镜像
docker pull {:host}/library/rabbitmq

# 拉取 postgresql 非官方镜像
docker pull {:host}/bitnami/postgresql</code></pre><p>2.重命名镜像</p>
          <pre><code># 重命名 redis 镜像
docker tag {:host}/library/redis redis

# 重命名 postgresql 镜像
docker tag {:host}/bitnami/postgresql bitnami/postgresql</code></pre><h3>镜像源方式使用说明</h3><p>1.添加镜像源</p>
          <pre><code># 添加镜像代理到 Docker 镜像源
sudo tee /etc/docker/daemon.json << EOF
{
  "registry-mirrors": ["https://{:host}"]
}
EOF</code></pre><p>2.拉取镜像</p>
<pre><code># 拉取 redis 官方镜像
docker pull redis

# 拉取 rabbitmq 非官方镜像
docker pull bitnami/rabbitmq

# 拉取 postgresql 官方镜像
docker pull postgresql</code></pre>
        </div>
    </div>
    <div class="footer">
        <p>©2024 <a href="https://voxsay.com">voxsay.com</a>. All rights reserved. Powered by <a href="https://cloudflare.com">Cloudflare</a>.</p>
    </div>
</body>
</html>
`

const routes = {
  // 替换为你的域名
  "dp.410006.xyz": dockerHub,
};

function routeByHosts(host) {
  if (host in routes) {
    return routes[host];
  }
  return "";
}

async function handleRequest(request) {

  const url = new URL(request.url);

  if (url.pathname == "/") {
    return handleHomeRequest(url.host);
  }

  const upstream = routeByHosts(url.hostname);
  if (!upstream) {
    return createNotFoundResponse(routes);
  }

  const isDockerHub = upstream == dockerHub;
  const authorization = request.headers.get("Authorization");
  if (url.pathname == "/v2/") {
    return handleFirstRequest(upstream, authorization, url.hostname);
  }
  // get token
  if (url.pathname == "/v2/auth") {
    return handleAuthRequest(upstream, url, isDockerHub, authorization);
  }
  // redirect for DockerHub library images
  // Example: /v2/busybox/manifests/latest => /v2/library/busybox/manifests/latest
  if (isDockerHub) {
    const pathParts = url.pathname.split("/");
    if (pathParts.length == 5) {
      pathParts.splice(2, 0, "library");
      const redirectUrl = new URL(url);
      redirectUrl.pathname = pathParts.join("/");
      return Response.redirect(redirectUrl.toString(), 301);
    }
  }
  return handlePullRequest(upstream, request);
}

function parseAuthenticate(authenticateStr) {
  // sample: Bearer realm="https://auth.ipv6.docker.com/token",service="registry.docker.io"
  // match strings after =" and before "
  const re = /(?<=\=")(?:\\.|[^"\\])*(?=")/g;
  const matches = authenticateStr.match(re);
  if (matches == null || matches.length < 2) {
    throw new Error(`invalid Www-Authenticate Header: ${authenticateStr}`);
  }
  return {
    realm: matches[0],
    service: matches[1],
  };
}

async function fetchToken(wwwAuthenticate, scope, authorization) {
  const url = new URL(wwwAuthenticate.realm);
  if (wwwAuthenticate.service.length) {
    url.searchParams.set("service", wwwAuthenticate.service);
  }
  if (scope) {
    url.searchParams.set("scope", scope);
  }
  const headers = new Headers();
  if (authorization) {
    headers.set("Authorization", authorization);
  }
  return await fetch(url, { method: "GET", headers: headers });
}

function handleHomeRequest(host) {
  return new Response(HTML.replace(/{:host}/g, host), {
    status: 200,
    headers: {
      "content-type": "text/html",
    }
  })
}

async function handlePullRequest(upstream, request) {
  const url = new URL(request.url);
  const newUrl = new URL(upstream + url.pathname);
  const newReq = new Request(newUrl, {
    method: request.method,
    headers: request.headers,
    redirect: "follow",
  });
  return await fetch(newReq);
}

async function handleFirstRequest(upstream, authorization, hostname) {
  const newUrl = new URL(upstream + "/v2/");
  const headers = new Headers();
  if (authorization) {
    headers.set("Authorization", authorization);
  }
  // check if need to authenticate
  const resp = await fetch(newUrl.toString(), {
    method: "GET",
    headers: headers,
    redirect: "follow",
  });
  if (resp.status === 401) {
      headers.set(
        "Www-Authenticate",
        `Bearer realm="https://${hostname}/v2/auth",service="cloudflare-docker-proxy"`
      );
    return new Response(JSON.stringify({ message: "Unauthorized" }), {
      status: 401,
      headers: headers,
    });
  } else {
    return resp;
  }
}

async function handleAuthRequest(upstream, url, isDockerHub, authorization) {
  const newUrl = new URL(upstream + "/v2/");
  const resp = await fetch(newUrl.toString(), {
    method: "GET",
    redirect: "follow",
  });
  if (resp.status !== 401) {
    return resp;
  }
  const authenticateStr = resp.headers.get("WWW-Authenticate");
  if (authenticateStr === null) {
    return resp;
  }
  const wwwAuthenticate = parseAuthenticate(authenticateStr);
  let scope = url.searchParams.get("scope");
  // autocomplete repo part into scope for DockerHub library images
  // Example: repository:busybox:pull => repository:library/busybox:pull
  if (scope && isDockerHub) {
    let scopeParts = scope.split(":");
    if (scopeParts.length == 3 && !scopeParts[1].includes("/")) {
      scopeParts[1] = "library/" + scopeParts[1];
      scope = scopeParts.join(":");
    }
  }
  return await fetchToken(wwwAuthenticate, scope, authorization);
}

const createNotFoundResponse = (routes) => new Response(
  JSON.stringify({ routes }),
  {
    status: 404,
    headers: {
      "Content-Type": "application/json",
    },
  }
);
请将脚本中的
dp.410006.xyz替换为你的域名。
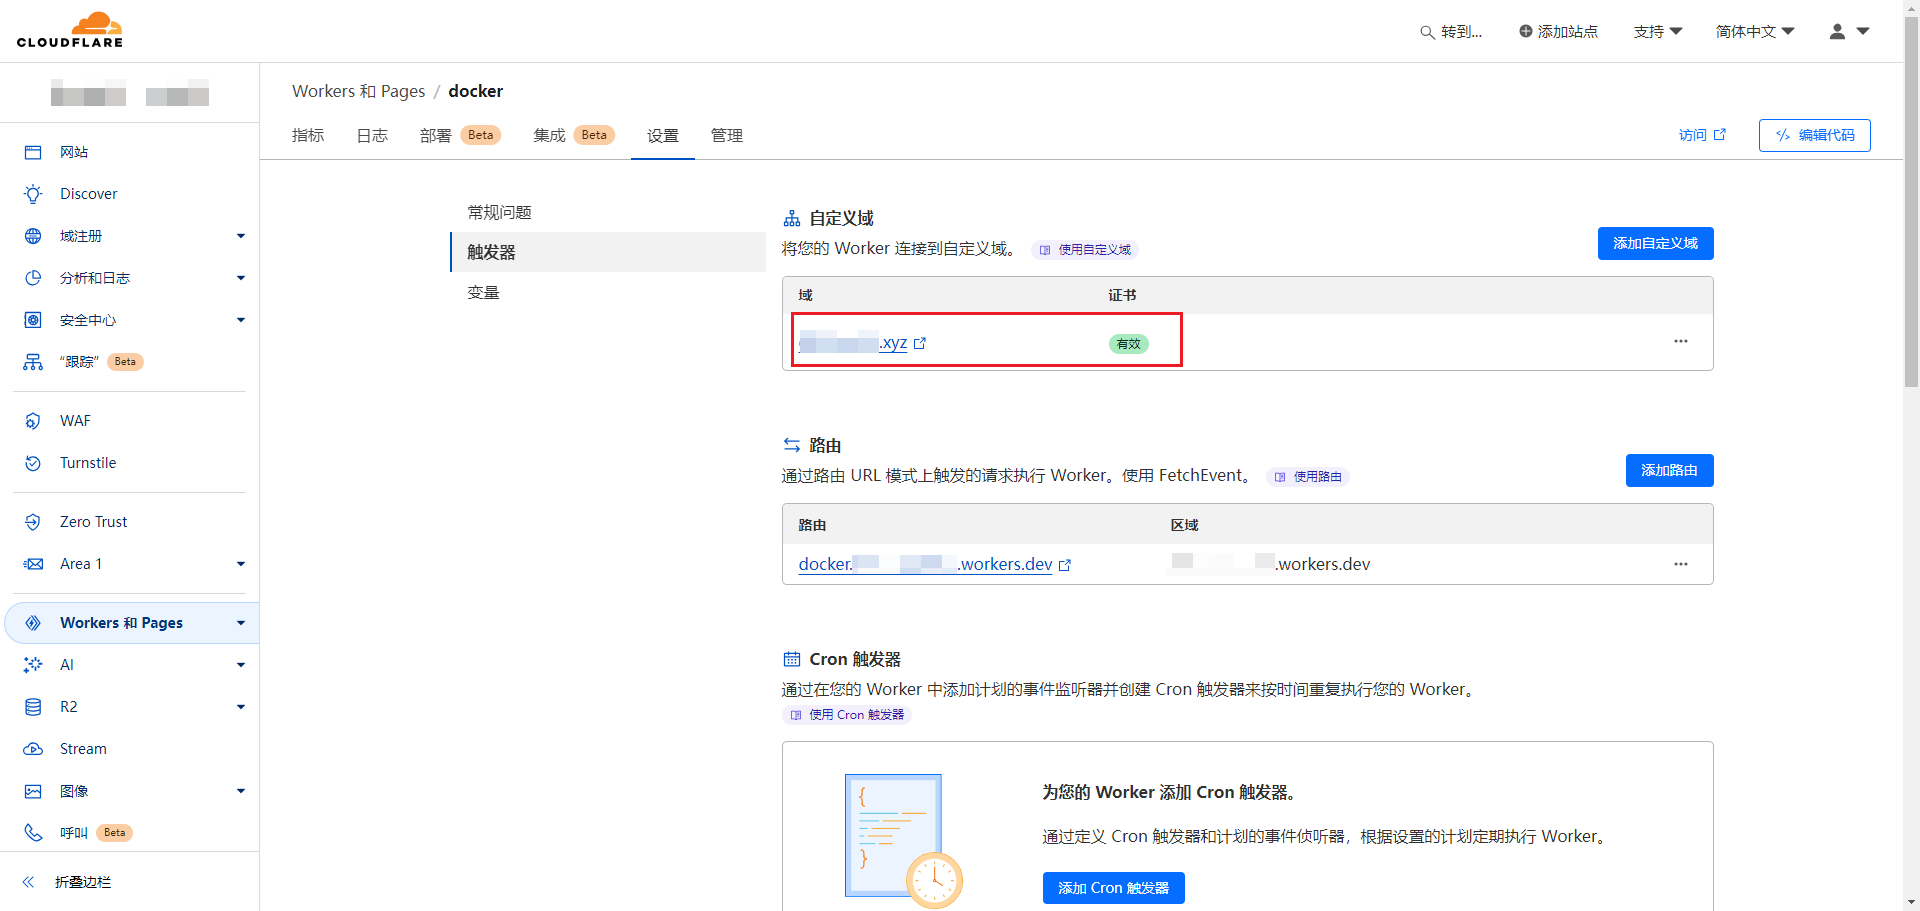
Step 2: 绑定域名
点击 docker 进入 Worker 页面,点击 设置 > 触发器 > 添加自定义域,输入你要绑定的域名,等待创建完成,如下图所示:
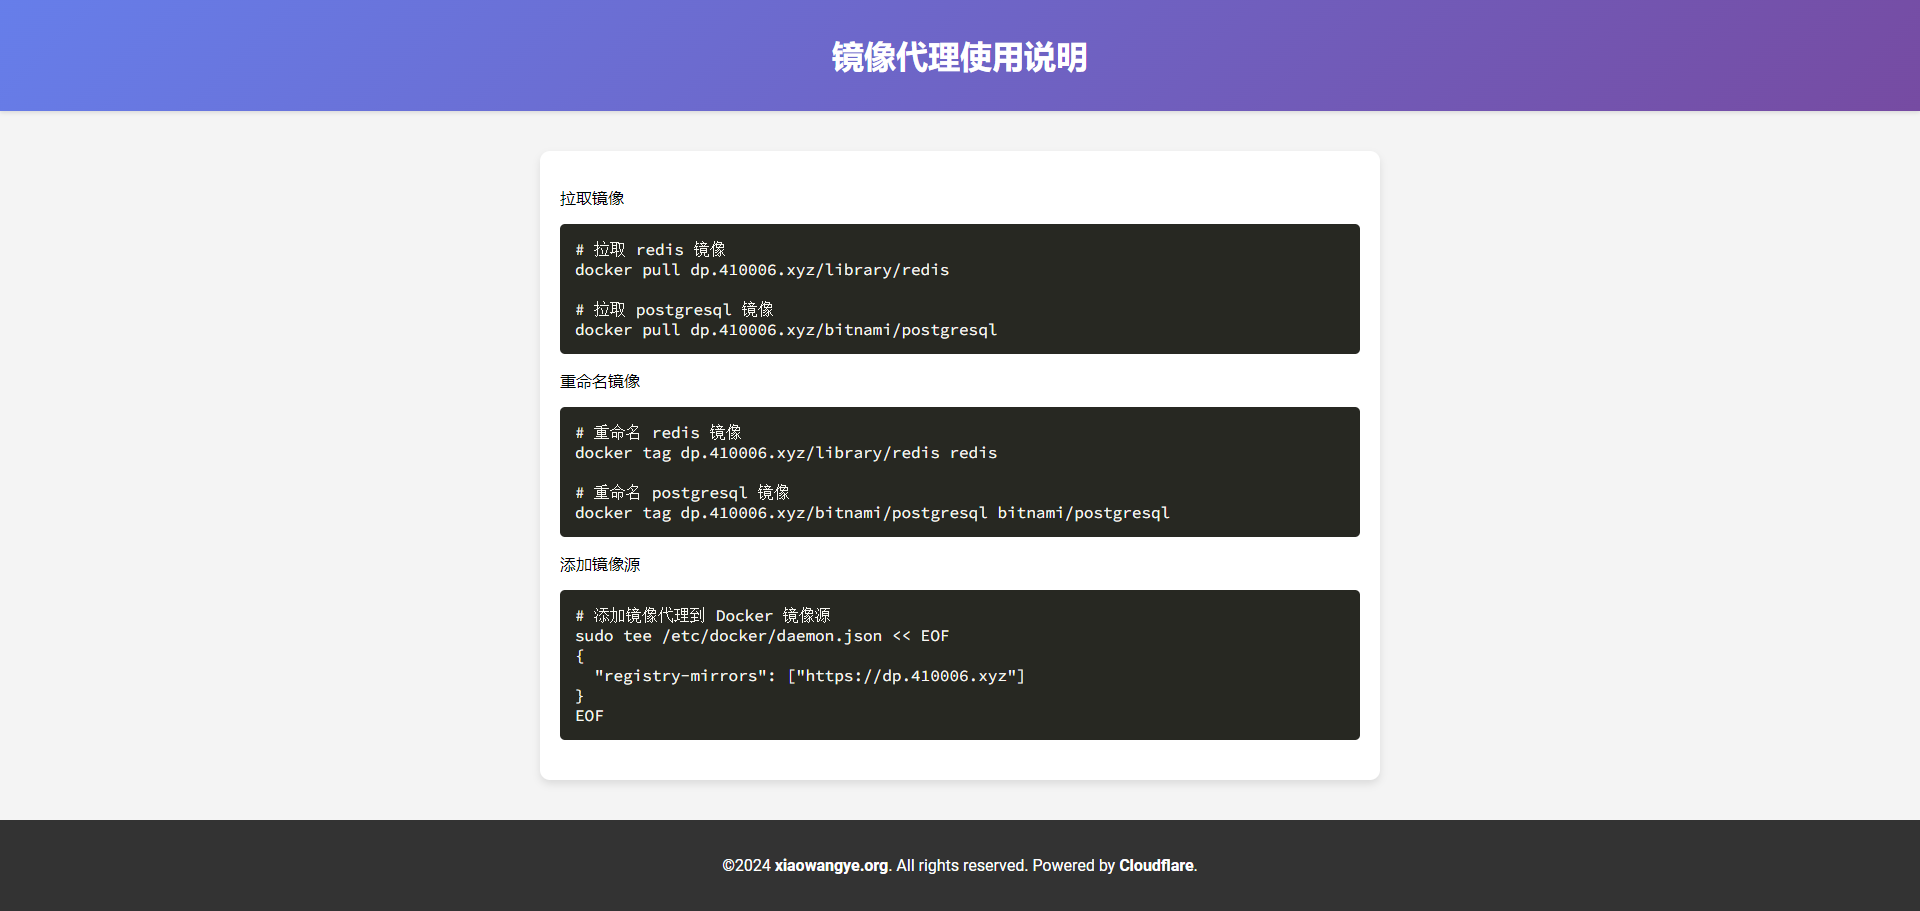
Step 3: 访问镜像代理首页
访问域名 dp.410006.xyz,可查看镜像代理的使用说明:
总结
在这篇文章中,我介绍了如何使用 Cloudflare Workers 创建一个名为 docker 的 Worker,并将其绑定到自定义域名。通过完成这些步骤,你可以使用自定义域名作为 Docker 镜像代理,最终绕过网络限制,成功拉取 Docker 镜像。


文章评论